Tuesday, June 27, 2023

Work Journaling

Intro

I've used a technique I call Work Journaling since 2005 to capture weekly doc work and notes, for keeping myself honest and my projects on track, and as a handy resource for centralizing information that is relevant to my work.

Personal story

As I started my career as a technical writer (TW), I thought everything would be a breeze: coworkers would ask me for writing assistance and I would wave my (digital) pen and the project would be magically done. At the end of my first month as a TW, my manager asked me for a summary of the work I completed. "Well, I did some stuff on project X and started things on Y." My manager wasn't too happy with that summary. He advised me to take better notes on the work I started and completed in the next month. So I did. I created a folder on my Linux machine, named a text file June-2005.txt, and wrote my first note: "Completed project Y on 6/3/2005. 3 hours." I did this every time I started and completed a project. Happy, I submitted what looked like a grocery list to my manager at the end of the month. He commented that this was an improvement but I was still missing details. So I added more details and the day before the end of the month, I summarized my accomplishments down to 2-3 lines. Still better but if you asked me what I did a few months back, who I worked with, what resources I sourced from, I couldn't even guess. At this point, my weekly text file was just enough to hopefully jog my memory but the real show stopper was when it came to writing up a quarterly summary. I poured through my text files in a desperate attempt to identify what I accomplished, what was impactful, and useful to the people requesting documentation. Every month or so for the first year, I iterated on this person system until it included several levels of detail (what, who, where, when, resources, links, etc.) all categorized by projects or teams. I had found a workflow that suited my needs and style of project tracking.

Journal Levels

I recently learned that my work journal is another form of a bullet journal but only my version was all digital. I developed several patterns for using my work journal and they are basically expressed like this:
  • Minimal - sporadically noting your work
  • Semi organized - uses some form of structure, includes dates, and more frequent work notes
  • High organized - requires a daily habit of including work accomplished, includes who you worked with, why you worked on a project, where your work can be found, links to important resources and project tickets, a section for a weekly summary, and a section for current high and low priority projects
These levels all depend on your end goal with keeping a work journal. Are you trying to keep yourself on track? Write better regular summaries? Remind yourself of what you did before you left for a long vacation? All the above?

Journaling Strategy

A typical TW has several locations to find stats, metrics, project tickets, project-related resources, and multiple platforms where content may be sourced. Utilizing a work journal as a personal information hub and as an extension of project tracking, I have found that work journaling is a much better resource to centralize all your project needs in one platform and system. This habit of keeping a work journal has kept me on track with my projects, their due dates, who I can go to for help, keep me honest, and others accountable.

What should a work journal include? Lets review the five W's:
  • What
  • Why
  • Where
  • Who
  • When

What

When designing your own template for work journaling, decide on what you need to capture in your notes. How detailed should your notes be? Sometimes a single sentence is enough to capture a week's worth of work for a single project and other times, you may need to write a paragraph to help your future self sort things out when it comes to summary time. You can also keep meeting notes in your journal as well but they shouldn't be included in your weekly summary unless they have some bearing on your project work. Finally, I'm a big fan of linking everything from my work journal. Wiki pages, Jira tickets, work announcements (that affect my work), and other resources that are relevant to my current projects.
Another positive aspect of using a work journal is leaving yourself with information your future self will appreciate as I found most company's internal search and content platform organization can vary greatly and thus be unreliable form of recreating important summaries at critical times.

Why

Another aspect of keeping a work journal is answering the question of "why am I doing X?" Are you handing off a project to someone else? Need extra reminders? Tracking progress on a long-term project? Reaching a milestone summary point? Going on vacation? Why is writing this down important to me and/or the project?
If you're keeping a work journal for the sake of writing, you might be overthinking the process and end up wasting time.

Several years ago, I had a project put on hold. Everyone dropped what they were doing and moved onto different projects. Six or months later, the project was reactivated and I had left myself with enough context in my journal to get myself back on track. In fact, in the first meeting back on this project, the project owner didn’t recall where we had left off and I volunteered a summary of my notes. Within minutes, everyone on the team had a refreshed memory and the project successfully kicked off from there.

Where

Where you keep your journal is important. Keeping it localized to a workstation is good but keeping your notes on a platform that is cloud based so you can access it from any company-enabled workstation is best. Putting your journal in an open wiki isn't a good idea as the content is discoverable by the search engine thus polluting the search results for you and everyone else in the company that has access to this wiki. If your wiki platform has a feature to keep a personal space (like Confluence does), you can use that wiki space as long as the default settings don't expose personal spaces to the search results by default.
Using Google Docs is another option too that I've come to enjoy. Creating a folder for each year with a single document for each week hasn't steered me wrong yet.

Who

Your journal should include who you worked with and who you met with so that you can go back and thank them at the end of a big project or to remind yourself who to ask questions to when you need their assistance.
Consider the audience for your summaries. Does your manager need a regular status update? If so, tailor your summaries for your manager and not the projects. 
Is your journal just for you? If it is, you can simply keep a log of the work you completed, resources, and time spent (minimal approach) as long as it helps you keep on track and keep yourself honest.

Note: Work journals should be devoid of opinions about work or people. Keep the journal focused on the facts of the work. At the end of the day since this journal will likely be kept on a company server, this content is the property of the company. Don’t write something that you’ll later regret.

When

When you update your work journal is completely up to you. Those who adapted to a system like this like to do it throughout a day, at the end of a day, or at the end of a week. I'm more of the "as needed" type. As I wrap up a stage of a project during my work day, I add a little note to myself on what I accomplished, who was involved (if anyone other than myself), and other notes as necessary.
Others keep the meeting notes in a work journal, whenever they start, update, or end a project, or whenever they feel like they captured some important information. Some TWs drop a note or two in their journal and come back at the end of the day to add details so they can pick back up the next work day.
A good way to wind down your work week is to write up your weekly summary. This shouldn't be an exhaustive exercise but rather a quick review of all your project work and summarized down to a few bullet points per project.

When I first started keeping a work journal, I would write notes at the end of the day. The problem here was that I didn’t have a good habit of reminding myself to do this. The next day, I would sometimes struggle to remember what I did the previous day. At this point, I needed to help myself to reinforce this habit by including a bit of time at the end of the day by putting the time on my calendar.

Summaries

Summaries are important to your long term success of any project or on your career path as a TW. I found keeping a weekly journal, summarizing the daily information down to a few concise project points helped me write monthly summaries which in turn informed my long-term summaries (usually quarterly, bi-annual, or annual summaries). This is where the true magic of keeping a work journal comes to live: writing long-term summaries.

Weekly summaries

As mentioned earlier, I like to wind my work week down by setting aside 15-30 minutes to collect all my thoughts, condense all my weekly accomplishments, and plan for next week. At this point, I found that by doing this weekly exercise, I am better able to look at the bigger project picture and be able to filter out the noisy bits of my work week. 

The following is an example of a brief and simplified but accurate example of a weekly work journal:

June 26th 2023
The summary section is what would get shared with my manager and other interested parties.

Tip: When tailoring your summaries, keep in mind who will consume them on a regular basis. Keep them short and concise.

Monthly summaries

At the end of every month, I summarize all my weekly summarized into a condensed high-level project review. Tip: if you keep track of project or personal metrics, now is the time to include them into your journal.
There are various methods for condensing your weekly summaries into a monthly summary. The best that I found goes something like this:
  1. Review each week's summaries for their primary topics and organize that into a list for your monthly summary to categorize all your work.
  2. Scrub each weekly summary for highlights and goals met.
  3. Condense redundant information into one line. For example, if you spent the entire month researching and writing content, summarize this activity with just one line.
  4. Include any key collaborator names that are important to making progress on your projects.
  5. Repeat steps 2-4 until you have exhausted all possible high level topics.

Long period summaries

Similar to monthly summaries, at the end of each quarter, half, or year, go through your monthly summaries and condense again. Boil down to the key projects but unlike the monthly summaries, add the why statement to each item. For example, let's say for the month of June, you completed a doc project and your summary line looks like this: "Collaborated with John to finalize the X feature." At the long period summary, if this was an important point, add why it was important or what the outcome was after it was completed. For example, I would revise this bullet point to read like this: "Collaborated with John to finalize the X feature which was mission critical to this release cycle as the Client needed this document on launch day and the document received 100 pages views in the first week."

Templating

Everyone has their own workflow and your work journal should fit your needs. You may choose a minimalist approach to journaling or go for maximum detail. Either way, you may want to create a template and customize to fit those needs which you can use again and again to start a fresh journal each week. Some use templating features of their chosen platform and others copy and paste the previous week's journal and strip out the unnecessary bits.

Your weekly template can be organized any way you see fit but if chronological order of things are important, consider the following structure:
  • Priority checklist (using checkboxes instead of bullets)
  • Weekly summary
  • Notes by day organized by category, project work, or by day
A monthly summary template may vary from month to month but the general structure usually follows that which you use in your weekly template. I like to keep all my monthly summaries in one document separated by month which then captures all the details for each project. Consider this format:
  • Month
    • Project X
      • High level detail 1
    • Project Y
      • High level detail 1
When I started condensing down to monthly summaries, my manager would limit me to 2-3 bullet points per project. Since then, I found that the level of detail may work or may not work depending on the scope and importance of the project. I still try to condense down to the good bits but I put a personal limit of 5 bullet points. Anything beyond that is probably too much detail for your consuming audience. The main point here is to condense as much as you can without sacrificing the important details.

Time Commitment

After presenting this concept of work journaling, the first question I usually get is "how much time do you spend writing all these journals?" I have a personal idea of how much time it takes me but for the first time user of this method, it will vary widely. When I first started journaling, I would spend about 15 minutes a week writing a minimalist journal. Once I moved up to a moderate detail level journal, my time spent doubled. As my habit grew stronger and stronger, time spent stayed around the 30 minute mark and my level of detail went up. I could pull out metrics, who, what, where my files were, ticket links, and when I worked on something in a quick search. At the end of each week, I would schedule myself 30 minutes to wrap up my journal, summarize, and review what I had planned for the next week.
Writing a monthly summary varies too. Depending on project activity levels, writing a monthly summary could take one to one and a half hours once a month. For long term summaries, again it would vary but for me writing a bi-annual summary, it would take me 2-3 hours once every six months. The better developed habit you have for organizing and keeping your journal would affect how quickly you can write your summaries.
In the end, having these summaries have been a great success for me as I have been able to pull out a project's status on a moment's notice, share with key stakeholders what was accomplished in any given time period, and also add lines to my resume on my key responsibilities.

Tuesday, August 9, 2022

Developing A Documentation Plan

In my professional experience as a technical writer, I've had the pleasure of working with several software development teams that have gone through highs and lows of successful product launches. The teams that included documentation as part of their planning process were often more successful than those who did not. This post will share a basic model for developing a documentation plan.


Planning Phase

During the planning phase, your technical writer should be present to identify any documentation needs and add a voice to the process so that end-user documentation can be included in the product life cycle. All too often, I've seen technical writers excluded from the process until the product is about 50-75% complete and then the project managers start asking questions like "Where is our documentation", "What is the status of our release notes?", or "Who is working on the documentation?" At this point, documentation will suffer as the technical writer must now go back through a bajillion documents, interview every developer and manager on the team to figure out what the minimal viable product (MVP) for documentation would be and do their best to reach that goal before release day.


Ideally, a development team would include you, the technical writer, in their planning process well before the midpoint of their project.


Setting Goals

Once the documentation set has been identified, you will need to collaborate with the subject matter experts (SMEs) to complete your doc tasks. During the initialization phase of this documentation project, you will need to complete the following items:

  1. Identify who the primary and secondary SMEs are. Developers often take time off from work and you need to know who else can help contribute to this project while they are out so that you don’t get blocked or have a slowdown that could potentially delay the project.

  2. Identify all the documentation components for MVP delivery and stretch goals.

  3. Prioritize these doc goals so the team will know what you and they will need to focus on first.

  4. Establish a timeline and due date for key components of the documentation.

  5. Set documentation milestones. At what point should feature X be complete? When should feature Y be drafted? When should the release notes be published?

  6. Set the paths of success and what failure would look like and include backup plans (e.g. what does 100%, 75%, and 50% complete look like).

  7. Set up regular check-ins with the team to provide doc status updates, gather new information, and general project communication. This can be done as a standalone documentation meeting if the project is large or be included as an agenda item for the regular team meetings.

Project Maintenance

With the scoping and expectation phase complete, the rest of the project is a simple matter of gathering information, writing, and publishing content, right? In a perfect world, yes but we exist in a space where perfection is the enemy. In my experiences, senior technical writers should include the following in their regular process to properly communicate documentation status:

  • Update associate project management tasks and timelines according to the doc project status and communicate these changes to key stakeholders. The frequency of this may be anywhere from daily to weekly depending on the size of the team, frequency of product updates, and other factors that would affect your doc plan.

  • At key intervals, review the project roadmap to ensure that you and the team are hitting your milestones. Communicate any project slippage, task completion, and other general progress with key stakeholders. This communication should also include how the SMEs contributed so they can be recognized for their contributions.

  • If the project is a long-term project, consider writing and publishing a monthly summary of all the completed work, where documentation energies are being spent, celebrate those who contribute to the documentation project, and highlight any interesting content traffic (e.g. wiki/web metrics, interesting search patterns, changes in viewership, etc.), and other bits of information that your team may find useful about the project.

  • If you are not the primary writer…

    • your team/company doesn’t have or enforce a style guide, you will need to build in some extra time to address documentation uniformity issues like tone, voice, and content structure.

    • As new documents become available, ensure they are properly cross-linked with existing content and vice versa. Let the primary content creator know that you will and/or updated their content so there are no surprises.

    • If a new document replaces an older one, if possible, let both documents co-exist for a brief time. Oftentimes, your users will need time to migrate off the old system and adapt to the new features. Add a banner or some sort of notice to the older document with a brief explanation, expected end of life date, and a link to the new documentation set. Sometimes you may be required to add a banner to the new document as well stating that this one replaces the older document. Include a link to the older one and a link to the release notes for further clarification. Once the older document has reached the end of life, set up a redirection feature in your wiki/web site to point to the new document and archive the older document from public view.

Thursday, November 14, 2019

Salary Calculator and Negotiating

If you're like me, you often get frustrated and/or confused about how much you should be getting paid as a technical writer. The Salary Calculator by Robert Half is a great tool that takes a lot of the guess work out of salary requirements. For example, I plugged in the following:

  1. Area of Specialization: "Technology & IT"
  2. Job Category: "Software & Application Development"
  3. Job Title: "Technical Writer"
  4. State: "Oregon" (as I happen to live here currently)
  5. City: "Portland"
At the writing of this article, the current salary range was $63.5k - $107.7k with the median being $76k. There should be a few things to keep in mind here with this salary range:
  • Bonuses and benefits are not included
  • You should add another 5-10% to your salary if you possess certain skills and/or certifications
Now that I know how much I'm worth and the fact that I feel very confident with my skills and work experience, I can confidently ask for the aforementioned salary range when applying for a new job.


If you are already employed, I found the article by Robert Half called How to Negotiate Salary After You Get a Job Offer rather useful for giving tips and advice on how to ask for more pay on the job.


Monday, October 14, 2019

Customizing Confluence: Last Modified Date

Introduction

At times of exporting content from Confluence, you may find yourself in a situation where a date stamp is required in the output files. Depending on your process for exporting content, by default, Confluence doesn't export time data (created or last updated) through its native means. If you have the budget, there are a number of plugins that can provide you with a macro to use in your documents but if you find your budget is tight, you can use the following code to create your own user macro to obtain a document's last updated date.

Required skills

You should be comfortable and/or knowledgable with the following:
  • HTML
  • jQuery
  • Creating user macros in Confluence
  • Modifying page layouts and space layouts in Confluence

Creating an user macro to display the last modified date

To create an user macro that display the last modified date, you can copy/paste the following code into your instance of Confluence:

Macro name: last-modified
Macro title: Last Modified
Description: Displays last modified date of the document.
Categories: Reporting
Macro Body Processing: No macro body
## @noparams
<span id="lastModifiedDate" style="font-size: 0.7em">Last Modified: $action.dateFormatter.formatDateTime($content.lastModificationDate)</span>


This simple little macro grabs the last modified date from Confluence and will display the value wherever you insert the user macro on your document. The font size is made to be purposely smaller so it won't be to noticeable on your document.

Modify layouts

If your process of exporting content includes the rendered HTML document, then instead of inserting a macro on every document can be replaced by updating the space layout with a little jQuery function to obtain the last updated date and insert it into the body of the wiki content element.

Note: Modifying the Content Layout of a space can be dangerous. If you remove a line from the Page Layout, you could corrupt the space and possibly make Confluence unstable. Use this method with care.

If you are using the Default Theme, insert the following code in Page Layout (Space Tools > Look and Feel > Layout > Create Custom under the Content Layouts in the Page Layout section) after the page setters:

<!-- last updated insertion -->
<script>
$(document).ready(function() {
$('div#main-content').append('<span style="font-size: 0.7em;">Last updated: ' + $('a.last-modified').text() + '</span>');
});
</script>
<!-- end last updated insertion -->

If you are using the Documentation Theme, insert the following code in the footer of the page layout:

<!-- last updated insertion -->
$(document).ready(function() {
$('div.wiki-content').append('<span style="font-size: 0.7em;">Last updated: ' + $('a.last-modified').text() + '</span>')
});
<!-- end last updated insertion -->


This method of inserting a last modified timestamp is, IMHO, the easiest and safest way to add a timestamp to every document in a space.

Friday, September 27, 2019

Managing Writers: Interview with Richard Hamilton (podcast)

I recently had a chance to listen to Tom Johnson's podcast entitled Managing Writers: Interview with Richard Hamilton and I found it to be very insightful. I totally agree that documentation metrics are difficult to nail down and pageviews aren't always the best metric (though a decent one).  I personally haven't found a good metric of productivity for tech writers. (If you have one, I'd love to hear about it.)

Documentation managers (writers or otherwise) are best served by simply staying aware of what their tech writers are doing and how heavily loaded they are on a regular basis. Having regular check-ins and one-on-ones is the best way to tell if a writer is overloaded or not.

Saturday, September 14, 2019

Migrating Content From One Confluence Instance to Another

Introduction

From time to time, as a Confluence administrator, you'll be called upon to migrate a space to a new Confluence instance. This guide provides some tried and true steps to generate a list of spaces in Confluence, figure out how active a space is (so you can decide if it should be archived, migrated, or simply removed), how to find a space owner, add a warning message to a space, set a space to "read-only" mode, and delete a space.

Required skills

You should be comfortable and/or knowledgable with the following:
  • HTML
  • Managing Confluence space themes
  • Basic Confluence administration
  • Exporting and importing Confluence spaces

Migrating Confluence content

  1. Generate a list of all the spaces in your old Confluence (instance). This list will be used as a checklist for tracking all the spaces that have been migrated to the new instance.
    1. To get a list of spaces, go to Spaces > Space Directory. This page will show you a list of all the spaces in your instance.
  2. Start reviewing the spaces for level of activity. I believe it is safe to say that if a space hasn't had any visitors in 6+ months, then it should be marked as archived and prioritized for either removal or migration.
    1. To see the level of activity, go into the space and then Space Tools > Activity. In the Activity page, set the Period for months and review the previous six months of activity by clicking on the previous button for the month section.
    2. To archive a space, go to the space in Confluence and then Space Tools > Overview. In the Overview page, click on Edit space details button. From there, change the Status to Archived and click on the Save button.
  3. Identify and speak with space owner(s) and get their permission to archive and/or migrate a space. Also ask them if the space should have a higher or lower priority for migration.
    1. To see who the space owner is, open the space and go to Space Tools > Permissions. Under Individual Users, you should typically see someone who has all permissions to the space. Another way to see who created the space is to go to the space's home page. This home page will have information about who created this page (which should be the person who created the space (i.e. the owner of the space) unless of course the Confluence administrator is responsible with the task of creating spaces.
  4. Work with space owner(s) on active spaces so you don't interrupt their work and set a date for migration.
  5. Add a migration warning to the space that it will be migrated on a designated date.
    1. To add a warning label to a space and the target space is using the Documentation Theme, follow these steps:
      1. Navigate to the space's Themes page (space > Space Admin > Themes).
      2. In the Messages section under Header, add the following code:
        {html}
        <div style="background-color: red; color: white; padding: 5px;">This space will be migrated on <span style="color: yellow"><designated_migration_date></span></div>
        {html}
      3. This will add a message on top of every page in the space and the unstylish colors will definitely grab the attention of everyone viewing the page.
      4. Note: it's a good idea to give everyone at least a two weeks notice about the migration.
  6. For unvisited spaces or spaces about to be migrated, put the space into "read-only" mode.
    1. To make a space "read-only", go to Space Tools > Permissions.
    2. In the Permissions page, you should see a list of space admins and groups. It would be best to leave the permission scheme alone for the space admins but if you have a group where all users fall under, change it so it is only set to All View to checked and everything else is unchecked.
  7. Export spaces on designated dates. Start with higher priority spaces and work your way down to the low priority spaces. See Export and Import a Confluence Space for instructions on how to export a space.
  8. Import the exported space into the new instance. See Export and Import a Confluence Space for details on how to import a space.
  9. Go into the newly imported space and confirm that everything is in proper order (content and attachments are fine, macros are working as expected, permissions are good, and so on). Note: this step may take a bit of time. I recommend that you get help from the original space owner(s) to confirm that the migration went well.
  10. Change migration notice to migrated and marked for removal. Update warning of the exported space in the old instance that it has been migrated (with a link to the new space) and add a removal date.
    1. To add a removal warning, repeat the sub-steps listed in step 5.
      1. Navigate to the space's Themes page (space > Space Admin > Themes).
      2. In the Messages section under Header, add the following code:
        {html}
        <div style="background-color: red; color: white; padding: 5px;">This space has been migrated to <a style="color: white; text-decoration: underline;" href="url_of_new_confluence_instance/display/<spacekey>">url_of_new_confluence_instance/display/<spacekey></a> and will be removed from this wiki on <designated_removal_date></div>
        {html}

      3. This will add a message on top of every page in the space and the unstylish colors will definitely grab the attention of everyone viewing the page.
      4. Note: it's a good idea to give everyone at least a two weeks notice about the removal.
  11. On the designated removal date, delete the space old space in the old instance of Confluence. While this is a very dangerous step, keep in mind that you have the exported zip file and the newly created space in the new instance. If anything goes wrong, you can always re-import the space back into the original Confluence instance.
    • To delete a space, go to Space Tools > Overview. Click the Delete Space button. You may be prompted to enter your credentials so be ready to enter that information. Click the Ok button to start the deletion process. Depending on how big the space is, this could take a few seconds or several minutes. Check with the Time Remaining counter (I find it's mostly accurate 90% of the time but that will vary from server to server based on your server's configuration).
Tip: You may want to include a message at the top of the newly imported space in the new instance where one can find the old space in the old instance. Just use the sub-steps mentioned in either step 5 or 10 and add the necessary info to point back to the old space.

Thursday, August 29, 2019

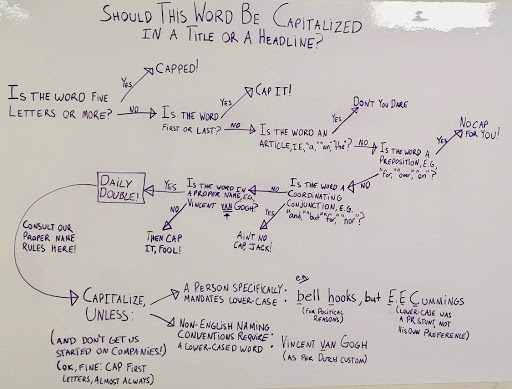
Should it be Capitalized

Every once in a while I come across fun little tidbits of knowledge. Today, I found this knowledge-nugget which guides one in how to capitalization in a title or headline.


Tuesday, August 27, 2019

Creating Authentic Human Connections Within A Remote Team

I recently read Creating Authentic Human Connections Within A Remote Team posted by Smashing Magazine and I really connected with this article. I have been working as a remote tech writer for three years now and I can say that this experience and what Randy Tolentino wrote is very true. I especially that "Reading emotions across the distance" section was point on. However, I don't agree that using emojis is necessarily a good solution. I think the use of emojis greatly depends on the personality of the person on the other side of the screen. Personally, if I'm having a back and forth with someone on an IM, I just ask if I can video conference with them for 5-10 minutes. That face to face time is much better at connecting to that other person and reinforce that we are humans and not just resources (as Randy mentions in this article).

Wednesday, August 14, 2019

Modifying an Exported Space From Confluence

Introduction

During times of Confluence migrations (from one instance to another), you may find yourself in a situation where the new Confluence instance has a space that has the same spacekey as an old space that you are attempting to import. This month's post will show you how to get around that issue.

Required skills

This document assumes you know how to export a Confluence space already and are comfortable with editing XML files.

Exporting and editing

To start, you will need to expand the exported zip file (that comes from exporting a space). In this expanded directory, you will need to edit the exportDescriptor.properties file. In this file, modify the spaceKey property to the desired spacekey and save your change.

In entities.xml, search and replace the following items listed in this table (replacing NEWKEY with an unused and new spacekey you wish to use in the new Confluence instance):
Search for Replace with
[CDATA[OLDKEY] [CDATA[NEWKEY]
OLDKEY NEWKEY
spaceKey=OLDKEY spaceKey=NEWKEY
[OLDKEY: [NEWKEY:
key=OLDKEY] key=NEWKEY]
<spaceKey>OLDKEY</spaceKey> <spaceKey>NEWKEY</spaceKey>
ri:space-key="OLDKEY" ri:space-key="NEWKEY"
ri:space-key=OLDKEY ri:space-key=NEWKEY
<ac:parameter ac:name="spaces">OLDKEY</ac:parameter> <ac:parameter ac:name="spaces">NEWKEY</ac:parameter>
<ac:parameter ac:name="spaceKey">OLDKEY</ac:parameter> <ac:parameter ac:name="spaceKey">NEWKEY</ac:parameter>
<property name="lowerDestinationSpaceKey"><![CDATA[NEWKEY]]></property> <property name="lowerDestinationSpaceKey"><![CDATA[newkey]]></property>
<property name="lowerKey">![CDATA[NEWKEY]]></property> <property name="lowerKey"><![CDATA[newkey]]></property>
spaceKey=OLDKEY spaceKey=NEWKEY
spacekey=oldkey spacekey=newkey

With those two files updated, re-zip all content back together, rename it to the original zip file (you may need to remove the old zip file or just rename it just in case), and upload it to your new Confluence instance as you would normally to import a space.

Sunday, July 14, 2019

Generate a Path/File Report of HTML Documents

Introduction

While there a bazillions of ways to generate a text file with all the directories and the respective files (Bash comes to mind), I wanted to explore Shell.js for doing this task so it could be chained together in a bigger set of Node.js tools I've been cobbling together recently. I also wanted to make it simpler than recent scripts I've written by foregoing Commander.js and just have it accept one argument which would be the directory to generate the report from.

In theory, I should be able to execute this command and get a text file back with all the files found there and all the nested files and directories: node app.js <directory>

Required skills and npm packages

You should be fairly comfortable with JavaScript and have some exposure to shell.js (0.8.3).

Required modules and variable setup

We'll need to require two modules (shell and fs), grab the user supplied directory (path), and set up a variable to hold the list of items found therein (output).

const shell = require('shelljs');
const fs = require('fs');
const path = process.argv[2];
var output = '';
...

Generate the report

If the path is supplied, then we should inform the user that the script in generating the report, recursively gather all the contents of the target directories, and save out the data to a text file called directorySiteMap.txt.

...
if (path) {
  console.log('Generating directorySiteMap.txt');
  shell.ls('-LR', path).map(function(file) {
    output += file + '\n';
  });

  fs.writeFileSync(directorySiteMap.txt, output);
...

Quit if path isn't supplied

If the path isn't supplied, the script should state as such to the user and gracefully quit.

...
} else {
  console.log('Directory argument is required. Quitting.');

  process.exit(1);
}

Wrapping up

Now we should save this script as directorySiteMap.js and execute it using this command: node directorySiteMap.js <directory>

Friday, June 14, 2019

Write The Docs 2019

The following is a summary of some of the presentations I attended and enjoyed.

Draw the Docs presented by Alicja Raszkowska was interesting as she advocated for using more graphics (particularly cartoons) in technical documentation. While I enjoy the notion of this, one must know their audience before they can start adding cartoons to illustrate their product and/or points. She is also developing a tool called mermaid that creates visual content similar to Visio but with custom images and markdown input.

Sarah Moir's presentation called "Just Add Data: Make it easier to prioritize your documentation" makes a good case for using analytics and other feedback to sort out prioritization of which documents should get the tech writer's attention.

Matt Reiner gave a very energetic presentation called "Show Me the Money: How to Get Your Docs the Love and Support They Deserve" which outlines how to make a business case for getting more resources for documentation. In Matt's presentation, he provides a good and detailed method for creating a business case and how to pitch it to management. I believe this is a good resource for all tech writers!

"How to edit other people's content without pissing them off" by Ingrid Towey was an interesting presentation on editing other people's content. The four principles are as follows: Assure that the content originator that we are all on the same side, when editing content, it's an edit and not an edict, explain why you're editing their content (preferable before you do it), and get help when thinks don't go smoothly. Good idea if one isn't already applying this.

Kathleen Juell's "Writer? Editor? Teacher?" presentation basically provided parallels to how tech writers can leverage teaching philosophy (particular college level) to technical writing. The topics she covered was basic documentation layout, design, and goals, providing templates, peer editing/reviews, and writing like as a teacher or an editor (clarify, explain, and goals). As a former college teacher myself, I see the lines between a teacher and tech write to be very blurry.

Shannon Crabill provided some thoughts and guidelines for how to manage documentation for an open source project in her talk called "Documenting for Open Source". Some tips include avoid assuming the technical knowledge of your readers (one should include a requirements section in your guides as to not lead on the readers who may get frustrated layer in the document when they discover they cannot complete it), README files are required, how to get users started, provide yourself or your team with templates (to avoid issues like duplicate PRs), and always provide links to any and all resources.

Heather Stenson provided some thoughts on how to get non-writers to contribute to documentation in a presentation called "Any friend of the docs is a friend of mine: Cultivating a community of documentation advocates". She defined who "friends of docs" are (those who write but are not technical writers), the different levels of friends of docs, how to get people to contribute more, strategies to find, support, communicate, and provide feedback to these friends, how to overcome obstacles friends of docs may encounter, and how to continue building this doc-friendly culture.

Chris Bush gave a dry-humor filled presentation called "SDK Reference Manuals: A flow-based approach". Overall it was dry but reassured that the process for creating, maintaining, and updating SDK docs haven't really changed all that much in years.

This conference also live-streamed and posted all their presenters on this YouTube playlist: https://www.youtube.com/playlist?list=PLZAeFn6dfHpmuHCu5qsIkmp9H5jFD-xq-

Tuesday, May 14, 2019

Using Nightmare.js to Generate a Sitemap From Confluence

Introduction

In a recent project, I had a task to generate a list of documents in a particular Confluence space. I chose to explore my options using Nightmare.js. Using this Node.js (version 10.11.0) module, it allowed me to programmatically enter my credentials into Confluence, navigate to a specific document, and gather a list of documents (thanks to the target document using the Children Display macro that listed all the documents of the parent page of the target space). I also wanted this script to take arguments (flags) such as the username, password, spacekey, output file, and a delay value so that the process can be automated for a variety of reasons.

Required skills and npm packages

This tutorial requires a number of skills and/or npm modules to complete everything mentioned herein:
  • Confluence (5.x): You should be comfortable with creating pages that utilize the Children Display macro
  • Nightmare (3.0.1): have some familiarity with the basics of this module
  • Commander (2.19.0): have some familiarity with the basics of this module
  • Cheerio (1.0.0-rc.2): have some familiarity with the basics of this module
  • CSS: basic knowledge of how to select elements
  • JavaScript: fair knowledge of how to use JavaScript

Setting up requirements

First, we set off with requiring a number of modules:

const Nightmare = require("nightmare");
const cheerio = require('cheerio');
const program = require('commander');
const fs = require('fs');

....

Set up nightmare and flag options

The next two lines sets up nightmare to display it's process as it's going through the steps we'll program it to navigate and a selector to find the content we're looking for in our target document. The confluenceSelector is the CSS selector that will be used to find the desired content in the main body of the Confluence document.

....
const nightmare = Nightmare({
    show: true
});
const confluenceSelector = '#main-content';

....

Note: you don't want to see an Electron window pop up and nightmare to do it's stuff, set show to false.

Next, we set up the flags and their usage using commander's features:

...
program
  .version('0.0.1')
  .usage('-u <username> -p <password> -s <spacekey> -f <output.txt> -d <milliseconds>')
  .option('-u, --user', '*required* Username id')
  .option('-p, --password', '*required* User\'s password')
  .option('-s, --spacekey', '*required* Spacekey for the Confluence space')
  .option('-f --file', 'Text file to be used for tracking Confluence document names. Can be set to either true (defaults to the spacekey naming scheme) or a file name.')
  .option('-d, --delay', 'Delay (in milliseconds) to wait for server response')
  .parse(process.argv);

...

With the flags set, we now need to parse them into an object that we'll use throughout the rest of the script. We loop through the program.rawArgs value provided by the commander module. In this loop, we are looking for specific flags so we can associate the flag with the value associated with it.

...
var argument = {};

for (var i = 0; i < program.rawArgs.length; i++) {
  if (program.rawArgs[i] == '--user' || program.rawArgs[i] == '-u') {
    arguments.user = program.rawArgs[i + 1];
  }
  if (program.rawArgs[i] == '--password' || program.rawArgs[i] == '-p') {
    arguments.pass = program.rawArgs[i + 1];
  }
  if (program.rawArgs[i] == '--spacekey' || program.rawArgs[i] == '-s') {
    arguments.spacekey = program.rawArgs[i + 1];
  }
  if (program.rawArgs[i] == '--delay' || program.rawArgs[i] == '-d') {
    arguments.delay = parseInt(program.rawArgs[i + 1]);
  }
  if (program.rawArgs[i] == '--file' || program.rawArgs[i] == '-f') {
    arguments.file = program.rawArgs[i + 1];
  }
}

...


Since the delay flag is optional, we should set up a fallback if the user doesn't supply one. In this case, we're setting the delay to 10 seconds though you can adjust this delay value to a number you're comfortable with your Confluence server responding a login page request.

...
if (!arguments.delay) {
  arguments.delay = 10000;
  console.log('Server response delay not set. Assuming ' + arguments.delay + ' millisecond delay.');
}

...

Now we should set up the file path where we keep the site map information. If the user doesn't supply a file to output our data to, the script will use a fallback based on the submitted spacekey name.

...
if (arguments.file) {
  if (arguments.file.length > 5) {
    var confluenceSiteMap = arguments.file;
  } else {
    var confluenceSiteMap = arguments.spacekey + '-site_map.txt';
  }
} else {
  var confluenceSiteMap = confluenceSiteMap.txt;
}

...

The next thing our script will need is the Confluence URL to the site map document. Using the Children Display macro in your target Confluence space, we can gather all the document links in a single space by scraping this one document. Note: you should set up this Confluence document accordingly before executing this script and ensure it's named Site Map. Otherwise, you'll need to change the values in arguments.confluence.

...

if (arguments.spacekey) {
  arguments.confluence = <base Confluence URL> + '/display/' + arguments.spacekey + '/Site+Map';
}

...

With the arguments parsed, we should check that the user supplied the required flags. If any of these flags weren't submitted, then the script should gracefully exit.

...
if (!arguments.user || !arguments.pass || !arguments.spacekey) {
  if (!arguments.user) { // user id is required
    console.log('Username is required.');
  }
  if (!arguments.pass) { // password is required
    console.log('Password is required.')
  }

  if (!arguments.spacekey) {
    console.log('Spacekey is required.')
  }

  process.exit(1);

...

Pull content with nightmare

With the required flags set, we can now request a document from Confluence using your credentials. This chunk of code starts the nightmare.js process by navigating the Electron browser to the site map page in Confluence. The process belows assumes that a login is required when the target page is loaded, enters user supplied username and password in the appropriate fields (denoted by their element ids), click the login button (denoted by it's element id), wait for a period of time (hopefully long enough for the server to respond), grab the content from the predetermined CSS selector via the evaluate method, return the data for parsing later, and close the Electron browser.

...
} else {
  console.log('Getting document link list from ' + arguments.confluence);
  nightmare
    .goto(arguments.confluence)
    .type('#os_username', arguments.user)
    .type('#os_password', arguments.pass)
    .click('#loginButton')
    .wait(arguments.delay)
    .evaluate(confluenceSelector => {
      return {
        html: document.querySelector(confluenceSelector).innerHTML
      }
    }, confluenceSelector)
    .end()

...

Parse content with Cheerio

Now that nightmare.js has retrieved the document in question, we use the then method to load the HTML content into cheerio.js to generate a list of links. Generally speaking, the links listed in a Confluence document usually follow the li span a selector pattern inside the body of the document. Here, we use the output variable to hold the list of links found in the retrieve data.

...
.then(obj => {
  $ = cheerio.load(obj.html.toString());

  var output = '';

  $('li span a').each(function() {
    output += $(this).html() + '\n';
  });

...

Then, we write out the list of links we found in the Confluence document to our predetermined text file.

... 
  fs.writeFileSync(confluenceSiteMap, output, 'utf8');
})

...

Finally, we use the catch method to report back any errors.

...
  .catch(error => {
    console.error(error);
  });
}


Wrapping up

With the script complete, we should save it something like confluenceSitemap.js. From there, we can execute this command to generate our list of links text file: node confluenceSitemap.js -u <username> -p <password> -s <spacekey> -f <links.txt>

Sunday, April 14, 2019

Comparing Published and Unpublished Documents in Confluence

Introduction

I recently had a challenge to upload over a thousand HTML documents to Confluence. I won't go into the details of what scripts I created using various Node.js modules, but I did want to share with you how I maintained a list of documents that were or were not published to Confluence.

Requirements

You should be comfortable with a terminal interface, managing documents in Confluence, and Confluence CLI plugin.

Using the Confluence CLI

I wrote a script that generates a list of documents and media files from a specified directory (I'll share that script and it's processes another time). From there I used the Confluence CLI plugin to report back a list of files that have already been uploaded to Confluence. The command was pretty simple:

confluence --action getPageList --id "<parent page id>" --descendents > uploaded_docs.txt

Note: the Confluence command itself needs to be setup as an alias in your Bash profile. The instructions for setting up the Confluence CLI plugin mentions how do some of this. My Bash alias looks something like this:

alias confluence="<path to confluence script>./confluence.sh --server <base Confluence URL> --user <user> --password <pasword>"

With that alias setup and a little forward thinking about how the space was going to be structured under a single document, I saved myself some time by parenting all the documents under this one ultimate parent document. (I wrote a script that handles that task as well which I'll share another time.) Having a single parent document, the CLI command reported back all the documents I needed to work with in one single execution of this command. Otherwise, I would have had to identify each parent document, execute this command on parent document, and tally up all the uploaded documents.

From here, with the two lists in hand, it was now a simple matter of finding the differences. There are several options out there to accomplish this but in the end, I just used Excel and used the conditional formatting feature to highlight the duplicates and the ones that weren't highlighted were the ones that needed to uploaded.

Maybe in the future I'll write a script that does this automatically from the two lists and share that process as well.

Thursday, March 14, 2019

Using Cheerio and Request to Scrape

Introduction

I've been heavily involved in content migration in the last few months. As a result, I've had look for solutions in pulling content from one site and push it into another. Often times, the source site wouldn't have an API to make my life easier. Enter cheerio and request npm modules. This tutorial will walk you through a basic routine of requesting a document and pulling content from a select set of elements.

Requirements

You should be fairly comfortable with JavaScript and CSS selectors in general and have some working knowledge of how Node.js works prior to digging into this tutorial.

Required npm packages

In this tutorial, we'll need to ensure the following packages have been install in your project directory:
Note: This tutorial was written with Node.js (version 10.11.0).

Setting up requirements

As mentioned earlier, this script will use cheerio to parse content with jQuery-like features and request to fetch content from a document. Next, we need to accept two arguments when executing this script: 1- A source document and 2- a selector to specify which element to pull content from.

const cheerio = require('cheerio');
const request = require('request');
const url = process.argv[2];
const selector = process.argv[3];
....

Input error handling

If the user doesn't supply an URL and a selector, the script should fail right away instead of attempting to extract something.

....
if (!url || !selector) {
  console.log('You need to supply both an URL and a selector.');
  process.exit(1);
} else {
  <main routine>
}

Requesting and processing the body

The main routine of this script is to request a document and process it using cheerio so we get at select parts of the content. If there isn't any issue in requesting the document and the status is good, then we pass the body of the document to cheerio. From there, you can add whatever features you like to process the content.

request(url, (err, resp, body) => {
  if (!err && resp.statusCode == 200) {
    $ = cheerio.load(body.toString());
    $(selector).each(function() {
      // do something with the content
      console.log($(this).html());
    });
  } else if (err) {
    console.log(err);
  }
});

Usage

With the script complete, we should complete the following steps to use it to pull content from the web.
  1. Save this file as request.js.
  2. Open a terminal in the same directory as request.js.
  3. Execute node request <URL> <selector> replacing the URL with the web document you'd like to pull content from and replace selector with the element id or class you wish want to pull content from. For example, try this one: node request.js https://crudthedocs.blogspot.com/2019/01/scraping-web-document-using-nightmarejs.html '.post-title.entry-title'
  4. Observe the output in the terminal.

Thursday, February 14, 2019

Creating a CLI For a Node.js Script

Introduction

I've been noodling around with allowing my Node.js script accept arguments and decided it was time to document some of the basics of using a library to give my scripts the flexibility of a CLI flags.

The npm package commander allows any Node.js script to accept flags (unordered arguments) and display usage information or warnings. This tutorial will walk you through the basics of setting up a CLI, confirm that a required flag was submitted, and display any errors with the CLI arguments.

Requirements

You should be fairly comfortable with JavaScript in general and have some working knowledge of how Node.js and command line interfaces works prior to digging into this tutorial.

Required npm packages

In this tutorial, we'll need to ensure the following packages have been install in your project directory:
Note: This tutorial was written with Node.js (version 10.11.0).

Setting Up a Node.js Script With a CLI

Let's start out by requiring the commander module:

const program = require('commander');

Set the flags

Next, we need to set up what options our CLI will have. In this case, we'll set the usage info and foo and bar flags making the foo flag required. The version method can be any number you wish and is entirely optional but it's nice to let your users know how many iterations this script has, right? The usage method tells the users how to use this script as a CLI.

program
  .version('0.0.1')
  .usage('-f <foo> -b <bar>')
  .option('-f, --foo', '*Required* foo')
  .option('-b, --bar', 'bar')
  .parse(process.argv);

Getting the arguments

With the flags set up, the script needs to be able to get at the arguments. We'll use the arguments object to hold those values entered by the user in the terminal. The program object has a nested object called rawArgs that we can iterate through looking for matches to the flags we want to associate with the process argument input. It should be noted that rawArgs escape some special characters like single and double quotes, exclamation points, dollar signs, and so on.

var arguments = {};

for (var i = 0; i < program.rawArgs.length; i++) {
  if (program.rawArgs[i] == '--foo' || program.rawArgs[i] == '-f') {
    arguments.user = program.rawArgs[i + 1];
  }
  if (program.rawArgs[i] == '--bar' || program.rawArgs[i] == '-b') {
    arguments.pass = program.rawArgs[i + 1];
  }
}

Fail or success

With the arguments properly stored, we can now either fail or allow the script to continue with the main routine. Since we are only requiring the foo flag, we'll set the script to fail it is not supplied by the user. Otherwise, the script will continue onto the main routine.

if (!arguments.foo) {
  if (!arguments.foo) {
    console.log('Foo is required.');
  }
} else {

  console.log(arguments.foo, arguments.bar);
  ..main routine...
}

Wednesday, January 16, 2019

Scraping a Web Document Using Nightmare.js

Introduction

I recently learned about another method to harvest content from a website using nightmare.js. Using other libraries such as request.js (with cheerio.js) works fine but if one needs to get around a login or has a need to navigate to get at the content, these libraries won't work. Enter nightmare.js and Electron. This document walks one through a basic setup of using nightmare.js to navigate to a site, login, and grab content from a specific element.

Requirements

You should be fairly comfortable with JavaScript and CSS in general and have some working knowledge of how Node.js works prior to digging into this tutorial.

Required npm packages

In this tutorial, we'll need to ensure the following packages have been install in your project directory: 
Note: This tutorial was written with Node.js (version 10.11.0).

Scraping Content with Nightmare.js

Like any node.js app, let's start off with setting up the basics requiring various modules. In this case, we are using nightmare.js to navigate a site, fs to write out the content to disk, and commander to set up flags for the script's arguments.

const Nightmare = require("nightmare");
const fs = require('fs');
const program = require('commander');
const nightmare = Nightmare({ show: true });
const selector = '.content';
...


Note: if you don't want to see Electron "jumping through all the hoops" to get at the content, you can set show to false. I think using commander library makes using this script easier to use as the input isn't order dependent. Finally, the selector variable is where the target content is located. In this case, the variable will be looking for an element with the content class. This variable can use any CSS selector method that you would like to use to get at the desired content.

CLI setup

Next, we'll set up the flags for the script. In this case, we should only accept three required flags: user (id), (user) password, and the URL of the target document.

...
program
  .version('0.1.0')

  .usage('[required options] -u <username> -p <password> -url <url>')
  .option('-u, --user', 'Username id')
  .option('-p, --password', 'User\'s password')
  .option('-url, --url', 'URL for site')
  .parse(process.argv);
...


Setting the user credentials and URL

Now we should set up the values passed into the flags as variables to by used by the script. The arguments object will contain the user, password, and URL values. I mentioned how to set up a Node.js CLI earlier.

...
var arguments = {};

for (var i = 0; i < program.rawArgs.length; i++) {
  if (program.rawArgs[i] == '--user' || program.rawArgs[i] == '-u') {
  
  arguments.user = program.rawArgs[i + 1];
  }
  if (program.rawArgs[i] == '--password' || program.rawArgs[i] == '-p') {
  
  arguments.pass = program.rawArgs[i + 1];
  }
  if (program.rawArgs[i] == '--url' || program.rawArgs[i] == '-url') {
  
  arguments.url = program.rawArgs[i + 1];
  }
}
...


Note: commander doesn't not process some special characters (e.g. ', ", !, $, and so on) for a variety of reasons. We won't get into that here today. So, if your password uses any of these special characters, it may not pass the string properly to the target server.

Exiting if required parameters are missing

Next, we'll set up the flags for the script. In this case, we should only accept three flags: user (id), (user) password, and the URL of the target document.

...
if (arguments.user && arguments.pass && arguments.url) {
  ...
  <main routine>
  ...
} else {
  if (!arguments.user || !arguments.pass || !arguments.url) {
    if (!arguments.user) {
      console.log('Username is required.');
    }
    if (!arguments.pass) {
      console.log('Password is required.')
    }
    if (!arguments.url) {
      console.log('URL is required.')
    }
  }
  process.exit(1);
}

Main routine

And now for the main (routine) attraction!
We'll use nightmare to navigate Electron to our desired document, clicked the login button, wait a bit (hopefully long enough for the server to respond), enter our credentials, submit said credentials, wait again, grab the content, write out the content, and announce any errors.

...
nightmare
  .goto(arguments.url)
  .click('#login')
  .wait(5000)
  .type('#usernameInput', arguments.user)
  .type('#passwordInput', arguments.pass)
  .click('#submit')
  .wait(10000)
  .evaluate(selector => {
     return {
    html: document.querySelector(selector).innerHTML,
    title: document.title
  }
  }, selector)
  .end()
  .then(obj => {
    console.log('Processed ' + obj.title);
    fs.writeFileSync('./downloads/' + obj.title + '.html', obj.html);
  })
  .catch(error => { // catch any errors
    console.error('Failed to obtain content from ' + arguments.url);
  });
...

  • The goto method allows nightmare to load up the desire document
  • click method clicks on an element. In this case we're going to clicked on a button with the id of login and (eventually) the user login button.
  • The wait method simply pauses the routine x number of milliseconds. This is often needed to wait for the server to respond to previous fired events.
  • The type method allows for text to be entered into fields. In this case, we are submitting our user id and password into the document elements with the ids of usernameInput and submitButton.
  • The evaluate method tells nightmare to look in the document for a element with the provided CSS selector. From there, we want to return to items to the script: the desired content and the title of the document as we'll use it for the name of the file we'll write out later.
  • The end method closes the Electron browser
  • After the script has retrieved the desired content, it's now time to do some processing on the returned object using the then method. In this method, we let the user know the name of the file the script is writing out and then write out the file with the desired content. Note, in this step, one can "massage" the content to fix their needs using cheerio.js or any other preferred method.
  • Finally, the catch method is used to catch any errors. Here, the script is using it generically to inform the user that the gathering process failed.

Thursday, July 19, 2018

Export and Import a Confluence Space

This guide walks you through the process of exporting content from one version of Confluence (5.6.x) to another (6.6.x).

Exporting a space

  1. Navigate to the space you wish to export.
  2. Click on Space Tools > Content Tools.
  3. In Space Tools page, click on Export tab.
  4. In the Export Formats section, select XML and click on the Next >> button.
  5. In the Export XMLOptions section, select Full Export (should default to this option).
  6. Click the Export button to start the process.
  7. Wait. Depending on how many documents you have in your space, this can take a few seconds to several minutes. Confluence will switch to a "In Progress" report page and periodically update the status of the download. Don't get discouraged if the original Time Remaining estimate lists some ridiculous number (it's just an estimate).
  8. Once it completes the process, click the Download here link just below the completion bar. You should receive a zip file with all the contents and attachments.
Note: you can modify the contents of a space by modifying the entities.xml file found in the zip file. It would unwise to do this but if you need to programmatically change something throughout an entire space, you can do that.

Importing a space

  1. Log into your target wiki instance with Confluence administration permission.
  2. Under the cog, click on General configuration and then Backup & Restore. Even though this says it's a restore feature, it also acts as a space importer as well.
  3. Under the Upload and restore a site/space backup, disable the Build Index checkbox. With this checkbox disabled, the upload will be faster. Otherwise, if you wish to build the index, you should do so after office hours depending on your server attributes.
  4. Click on Choose File and navigate to where you downloaded your exported zip file and click on Open.
  5. Click on Upload and Restore.
  6. Confluence will take you to an import progress page that estimates the upload process. This may take a moment or two depending on the size of the space you are importing.
  7. Once completed, you should check the newly imported space to confirm it's contents.

Tuesday, April 24, 2018

Write the Docs Newsletter – November 2017

Little late on catching up with my Write the Docs newsletter but November 2017 offered some good tips:


Worth it: images & screenshots

This month, we had a couple of conversations about images and screenshots that raised some interesting questions. When do we need to include images in our documentation? How many images is enough? How many is too many? Given how difficult they can be to maintain, are they even worth it?

Of course, our community of documentarians had a variety of good answers to share. For starters, there was a consensus that screenshots are inherently challenging. They take a significant time commitment to maintain, especially for a product with frequent UI changes. It was also pointed out that they are often overused and may not even be that useful to our readers. Diagrams, on the other hand, can be incredibly useful when designed well. Overall, the feeling was that using some screenshots and other images in your documentation is usually worth it, especially if you can commit some bandwidth to maintaining them.

Some other image tips that came up included:
  • Crop your screenshots to highlight only the specific area of interface you're documenting.
  • Keep all of your image files in a single, separate location. If possible, use version control.
  • Develop – and stick to – a standard for producing screenshots: size, tool, resolution, file type, etc.
  • Triage your updates. Prioritize functional UI changes over changes in button color, for example.

A {} by any other name

Sometimes, when scanning Slack, it's easy to spot which comments are going turn into newsletter fodder. Other times, a trivial comment will unexpectedly blow up. This month, what started as a quick 'hey, what's the name for this punctuation mark?' turned into a surprisingly in-depth and entertaining discourse.

For many of us, our primary use of {}, [], and () is in code. But what you might not know is that a) there is a dizzying array of names for these marks and b) when using them in prose, they have some interesting uses you might not be familiar with.

Just in our own Slack community, people said they refer to {} as squiggly brackets, braces, curly brackets, curly braces, and (totally seriously, I'm sure) curly wurly woos. If that's not enough, the wikipedia article on brackets is not only a hilariously deep rabbit hole, but also provides us with more names including: French brackets, definite brackets, swirly brackets, birdie brackets, Scottish brackets, squirrelly brackets, gullwings, seagulls, twirly brackets, Tuborg brackets (DK), accolades (NL), pointy brackets, third brackets, fancy brackets, and m braces.

As for their use in prose, as opposed to code, someone shared a Grammar Girl article, which digs into the various proper usages for () and []. (Curly wurly woos don't come up much in prose, so the post doesn't touch on them much.)

So remember, for the Write the Docs hivemind, there is no question too big, and no question too small.

It's your turn to ask the questions

We've all fretted over what we might be asked during an interview. But what about when it's our turn to ask questions? This month, a job-hunter sparked a great conversation about what to ask in an tech writing interview. We've written up a few highlights:

Show them you know your job. Asking specific questions about their expectations and processes can get you into the nitty-gritty, and give you a chance to show off your chops. This blog post has some good examples.

Don't be afraid to follow up. If something they say raises a concern – or just piques your curiosity – loop back to it when your turn for questions comes.

Ask what they think of your resume. Directly asking about your application materials gives the interviewer a chance to ask about your background, and you a chance to clarify or crow about your previous roles.

Have a couple backups. Some of your questions will be answered in the course of the interview, so come prepared with spares.

Clarify next steps. When the interview is wrapping up, make sure to ask when you can expect to hear from them. If they don't give you a firm date, tell them you'll follow up in a week.

The bottom line is to remember that you're asking questions to help you figure out whether the job is a good fit for you too.

To automate, or not to automate

One Slack contributor's triumphant story of automation success sparked a thoughtful series of posts about when and how to automate routine tasks – and when not to. We had a cautionary tale of an elaborate automated doc toolchain that couldn't be maintained after its creator left the company, nice distinctions between personal productivity hacks and automation for a larger group, and meditations on automation ROI. Here are some key takeaways:
  • Automate all you like if it's just about your own work - whether it's email routing rules, keyboard shortcuts, or any other professional task for which you're solely responsible.
  • Think more carefully about ROI and usability if you want to automate shared work. By all means automate routine and time-consuming tasks ("barnacle scraping" as one writer put it). But the cost:benefit ratio might not be worth it when it comes to one-off tasks. (This goes for personal automation too.)
  • When considering an automation, consider not just the time and tedium saved, but also what it might take to make automation usable for more people. Make sure, too, that you're not threatening someone's job by taking away a manual process they're committed to or depend on.
  • Remember that automation can help reduce errors, too.